Introducing the new MediaHub App for iPhone and iPad

Today we are very excited to announce the launch of the new MediaHub iOS App, which enables you to browse, search and save items on your iPhone, iPod Touch or iPad.

If you want to download the app and have an iOS device then head over to the App Store here. The app is free to download!

The MediaHub iOS App Featured screen for June/July 2015

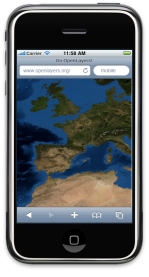
The Featured screen in the MediaHub iOS App.

Who is the MediaHub App for?

The app is for any user of MediaHub based at a subscribing university or college and using an iOS device (an iPhone, iPod Touch or iPad/iPad Mini).

In order to provide you with the appropriate search, preview and bookmarking functionality the app is limited to those from institutions that support UK Federation login.

When you first download and set up the app you will be asked to login with your username and password. Once you have been logged in – which may take a few seconds – you are ready to go and you will remain logged for several months before you will be asked to reauthenticate. This helps ensure that our licensed content remains secure, without compromising the speed or ease of browsing through the app.

Is there an Android version?

We know that MediaHub users have or access a wide variety of mobile devices and we are currently building an Android App at the moment to ensure more of you have access to MediaHub whilst on the move. We expect the Android App to be available later this year.

What can you do with the app?

As the MediaHub App will be of most use when you are away from your laptop or desktop machine, rather than include the full range of functionality available on the web service, the app has been designed to enable you to search or browse for content on the go. Use it on your commute, when filling time between lectures or meetings, or when you get that great idea and want to quickly save an item to look at or include in your presentation later.

The app allows you to:

  • Browse featured content – the highlights from our collection which also appear on the front page of MediaHub.
  • Browse the most popular items – this is always an interesting and entertaining way to explore our content, as readers of our Most Popular blog posts will already be aware.
  • Search for MediaHub content – with the option to filter by format (video, image or audio), and to search external collections. You can also choose how your search results are ordered, by relevance, title or distance from a location – either your own current location or a location you have selected on a map.
  • Preview and view MediaHub items – including being able to watch videos in full (although we recommend that you do this via a wifi connection to minimise possible data charges).
  • Favourite MediaHub items for later use –  when you favourite an item in the app, it will also be added to your favourites list when you next login to the MediaHub service website. And similarly anything you have previously favourited in the service, will be synced to the app. So, you can search, browse, and select items whilst on the move, then download and edit into presentations, lecture notes, student projects, etc. when you are next editing these on your laptop or desktop machine.
  • Share MediaHub items – via email and phone messaging.

To give you an overview of the MediaHub App and how it works we have created the following user guide video:

Click here to view the embedded video.

How can I provide comments, questions or feedback on the app?

We welcome all of your comments and feedback on the MediaHub app, and on any aspect of MediaHub.

There are a few ways you can share your thoughts on the app:

Leave a comment and/or rating in the App Store

This will not only help us, but will also mean that your fellow MediaHub users hear your comments, constructive criticisms or top tips about the app. We would really appreciate your comments and ratings in the App Store as these can really help other new users to find the app, decide whether it is the right choice for them, and get an idea of how it is being used by others.

Leave a comment on this blog post

We will be keeping an eye out for comments and, like the App Store, any comment posted here will also benefit your fellow MediaHub users who may well have similar questions. We can then reply publicly  – and may update this post with new information as a result.

Join us for a Webinar!

To mark the launch of the MediaHub iOS App we will be holding several short webinars on the app, what you can do with it, and how you might use it in your teaching, learning or research. We welcome your comments during the webinars – or send in your question ahead of time and we will ensure it is included.

We regularly run MediaHub webinars and you are always welcome to participate and comment.

Contact us privately via the EDINA Helpdesk

If you would prefer to ask your question in a less public place, or have a very specific problem, question, etc. then you can contact the MediaHub team via the EDINA helpdesk: email: edina@ed.ac.uk or by phone: +44 (0)131 650 3302.

Who built the MediaHub App?

The app was built by the MediaHub team, based at EDINA. Not only did they build the app, they also baked a MediaHub App cake to celebrate its launch!

Image of the MediaHub team with celebratory cake

The MediaHub Team, from left to right: Catherine Fleming; Lorna Campbell; Mark Allan; Tim Stickland; Viv Mayo; Nicola Osborne; Niall Munro.

Where can I find the Terms and Conditions?

When you download the app you will be agreeing to the terms and conditions for the MediaHub App. You can read these in full via the App Store, and you can also read and save a copy from the link below. At login we ask you to agree to terms and conditions for Grapevine, the MediaHub bookmarking and personalisation service. You can read these in full via the link below. As with the web service, all use of MediaHub content must comply with the MediaHub Terms of Service.

If you have any questions about how to use the MediaHub App, the MediaHub service in general, or how to use any image, video or audio item that you have found through the app or service, please get in touch with our colleagues on the EDINA helpdesk, who will be happy to answer your questions. You can contact us via email: edina@ed.ac.uk or by phone: +44 (0)131 650 3302.

What does the MediaHub iOS App Look Like?

The screenshot at the beginning of this post, and the images below, give an ideas of how the app looks on an iPhone.

The MediaHub iOS App Search Settings screen

The MediaHub iOS App Search Settings screen

The MediaHub iOS App Search results screen

The MediaHub iOS App Search results screen

The best way to find out how the app looks and works is by using it! So, please do download the MediaHub iOS App, try it out, and let us know what you think!

Exploring Data on your iPhone

This post describes a methodology for exploring the data on your iPhone/iPad that you have captured using Fieldtrip GB.  Why might you want to do this?  Well there are a couple of reasons:

  • You have cleaned your Dropbox account and deleted the records
  • Some of the data didn’t seem to upload to Dropbox*

* we have had 1 user report that some of their photos did not transfer to DropBox during “Upload Records”.  This is odd and may be as a result of a patchy data connection.

iExplore

iExplore

  1. Download iExplore – this is a free utility for your desktop that allows you to explore the file system on your iPhone
  2. Instal iExplore 
  3. Open iExplore – click continue with Demo
  4. Connect iPhone/iPad to your computer
  5. In the navigation on the left select Apps –> Fieldtrip GB –> Documents –> Edina –> Assets
  6. You should see a folder for each asset you have created.
  7. You can copy these to your Desktop or directly to Dropbox if you have a Dropbox folder on your Desktop

This should allow Apple users to find and retrieve data that they have collected using Fieldtrip GB without having to use the Upload Records function.  However, we would still strongly recommend using the Upload Records function and then access the data through the FtGB Authoring Tool.


Geo-tools for Teaching and Learning

I’ve been out and about quite a bit over the past 2 months, mainly to promote Fieldtrip GB but this has given me the opportunity to sit through some interesting presentations and i have found out about a number of great tools that i thought i should share with you.

Polldaddy – this is an online service that allows you to create and conduct quick polls.  You can view the results immediately so the exercise can become interactive when you are teaching. You can use Polldaddy on websites or through mobiles with their app.  Quick, easy and effective.  The free account gives you 200 survey responses a month and up to 10 survey questions per survey. There is a Pro account which cost $200 per year.

Skitch – Skitch is a annotation application from the makers of Evernote. Skitch allows users to annotate images and screen-grabs, adding extra information and notes.  This could be great when students are out in the field. Students could take a picture and then augment the picture with their own notes e.g. adding in a fault or rock unconformity. One neat feature is the ability to sketch on maps, the app launches Google Maps you just sketch away. Skitch is available for iPad/iPhone, Android, iOS and Windows.

Skitch

Skitch annotations on a photo


SkitchMap

Skitch annotation on a map

Fotobabble– Fotobabble allows you to add audio clips to images, they call it talking photos and slideshows.  This could be a great way to convey information to students, give them a visual representation and then some audio which triggers a discussion point. Or, get the students to use it to augment the photo’s the capture in the field.  This way they will not be left trying to remember what on earth  the photo is supposed to represent.

Fotobabble

Fotobabble – talking photo’s

iSpot – this one is a bit different, it is a project which aims to crowdsource ecological mapping, but there is a twist.  The user can take a picture of a plant and submit it.  iSpot has a team of experts who will identify the plant species and provide the user with some information about the plant.  This is neat in that the users get information that they are interested and the project team get data from locations around the UK.  An example of a symbiotic crowdsourcing scientific project?  Quite possibly.

iSpot

 Google Earth Engine (coming soon) – Google Earth Engine is Google extension of customisable views in Google Earth.  With Earth Engine users can upload their own data and perform simple spatial analysis on them. The obvious advantage with Earth Engine is that users dont really have to worry about base mapping data, they have access to all the imagery from Google Earth.

Google Timelapse datasets – this is what large organisations can do if they focus their processing power.  Google has made mosaics with all the data from Landsat 5 and Landsat 7.  This is a huge amount of data and a colossal amount of processing.   Some great examples of the time lapse include:

This stuff was the preserve of the remote sensing scientists, but is now accessible to anyone with an internet connection. This would be great for demonstrating any temporal change that has occurred since 1984, as long as it is big enough to be visible from space.  


Fieldtrip GB – this is an app fro EDINA that enables users to capture data on their phones. Users can choose to create their own data collection forms and once collected, data can be exported to csv, kml and geojson format.  The app is also suited for collecting data as a group exercise, a great idea if you have lots of students and want to crowd-source data collection to demonstrate an example. There is a blog article on how to set up a group exercise on the FtGB blog.

Fieldtrip GB

Fieldtrip GB

In addition, there were a number of apps that were worth a look.  I have listed them below with the briefest of descriptions. If you want more information, then just click the links and have a play.

  • QuakeFeed  (Apple) Earthquake feed for most of the World.
  • Earthquakes (Android)Earthquakes is a quake application that based on multiple data sources. With this app, you can get the latest earthquake info immediately from all over the world. Also, you can search the earthquakes occurred in the past.
  • GPS Note (Apple) With GPSnote you can easily add, edit and delete notes on the map.
  • OS Converter – (Apple) Easily convert between British National Grid References (i.e. OS Grid Refs) and Latitude, Longitude coordinates (both OSGB36 and WGS84 are supplied).
  • Altimeter – get heights in real time.  Android – DS Altimeter. Apple – Travel Altimeter 
  • Clinometer – measure slopes. Android – Clinometer   Apple – Clinometer HD
  • Decibel Ultra – measure noise levels in the field. Android – Decibel-O-Meter. Apple – Decibel Ultra
  • Rainfall Radar – takes feeds from rainfall radar satellites and trigger an alarm if you are about to get wet. Android – OSM RainAlarm Apple –  MyRadar

That’s about all i can remember, if more comes back to me then i will add it to the post.


Fieldtrip GB hits the the iTunes AppStore

Good news fruit based phone fans, Fieldtrip GB is now available or iPhone and iPad.  You can download the app for free from the iTunes App Store. It contains the same functionality as the Android version and we hope you like it.  We are currently working on a few tweaks and would love to hear what you think about the app.  To provide feedback just drop us an email to edina@ed.ac.uk just put “Fieldtrip GB” in the subject field and it will get to the development team.

Fieldtrip GB – A data capture app from EDINA

EDINA, the Jisc funded data centre based at the University of Edinburgh,  has just released an app that allows users to capture data against high quality base maps.  Fieldtrip GB has been designed to support teaching, learning and research in Great Britain. In summary, Fieldtrip GB:

  • is free to download and use
  • uses high quality background maps that offer rich data in both urban and rural environments
  • allows maps to be cached for off-network usage
  • enables data capture
  • includes the ability to create custom data collection forms that allow users to define the data they want to capture.

So what does it look like?

The app is split into 4 sections; Home, Maps, Capture and Download and Sync.   In addition there is a header which displays active elements such as the GPS/GPS tracking and a footer which allows quick navigation between the sections (Fig 1).

Fig 1 – Fieldtrip GB Home Screen

Quality Cartography

Part of the appeal of Fieldtrip GB is the mapping it uses.  The maps have been designed and optimised for a small screen making them ideal for viewing on a mobile phone. One of the challenges when creating the app was to ensure that the mapping worked in both urban and rural environments.  This is tricky as user will be looking for buildings, roads and road names in urban areas but users in rural areas may be more interested in features such as contour lines and rivers. Getting the highest zoom levels right was tricky but a new feature in Mapserver 6.2 allowed the developers to create an urban mask. Areas that were considered to be “urban” would display OS Street View data, whereas “rural” areas would display OS VectorMap District data augmented with OS Land-Form PANORAMA contours and path data from Natural England. In addition, considerable effort was made to place labels in sensible places, not an easy task when you need to automate the process for the whole country. Examples of the cartography are shown below (Fig 2)

Fig 2 – Examples of the mapping in Fieldtrip GB (left to right – Urban, Rural, Urban-Rural boundary)


Off-line maps

We understand that mobile data connectivity is not reliable in many areas of the country. Fieldtrip GB has been designed to allow users to download maps to their phones prior to going into the field. This way they will be available when data connectivity is not. There is the additional advantage that you can use WiFi to download the maps and not eat into your data allowance.

Capturing data doesn’t require a data connection.  You can collect data all day, or in fact all month, and then upload it all when you are able to connect to a strong WiFi signal.

Capture Data

There are two ways to capture data in Fieldtrip GB; by using one of the standard capture elements which support text, images, audio and GPS tracklog capture, or through the custom capture forms.

The custom capture forms are created through the Fieldtrip GB Authoring Tool. This is a website that allows users to design forms by dragging elements into an editor and defining the specific parameters they want to capture (Fig 3). We think this is where Fieldtrip GB really stands out as a useful research tool.  The Authoring Tool allows you to design data capture to meet your specific research aims. Custom data capture forms are uploaded to you Dropbox folder so that they can be accessed from your phone. To load them on your phone, just login and then perform a sync. This will grab any new forms from Dropbox  and save them to your phone.


Fig 3 – Overview of the Authoring Tool

Here’s an example of a form, in this case it is for collecting information about rocks (Fig 4). There is a drop down selector allow users to specify sedimentary, metamorphic or igneous rock types, sliders to record dip and strike, a note book reference and a photo capture option. Quite simple things, but easy to record and data will be consistent. We added a field-note Book ref so users could tie the digital record to their paper notes which might include specific details or a sketch.

Fig 4 – Example of a custom data capture form

Upload –> Edit –> Share

Once you have captured your data you can upload it to your Dropbox account and then either access it from there or view, edit and export it through the Authoring Tool (the authoring tool is so much more than an authoring tool).  In the authoring tool you can export the data from GPX format to other useful formats such as KML. You also have the option to share your maps with others. The Authoring Tool will mint a WMS of your data and provide you with a link embedded in your Dropbox folder, all you have to do is control who you share this link with.

What’s Next?

Well, the app is available for Android Devices and you can download it from the Google Play Store.  We have submitted it to the Apple iStore and are awaiting approval.  If all goes well this should take no more than a couple of weeks.

As for future versions and developments, we have a few features that we want to improve but what we really want is feedback from users. What would you like to see in the app?  What would you need to make this an indispensable tool for teaching and research.

 Take a look at the Fieldtrip GB website

Augmented Reality View of AddressingHistory Now Available for iPhone, Android or Nokia Ovi Phone

We are extremely excited to let you know that you can now explore an “Augmented Reality” version of AddressingHistoryusing your iPhone or Android device. You can stand on a street in Edinburgh and see who used to live there!

How does it work?

The AddressingHistory layer works with the Layar App to compare information about your current location (from your phone) and the geo-referenced entries in AddressingHistory to work out which historical residents and businesses used to be located near where you are standing at that moment. These are displayed as “points of interest” – little icons that hover over the appropriate locations.

On your phone you will see these points of interest – historical people and places of business – overlaid on a live image from your camera. Moving the camera around lets you see historical addresses in all directions. Tapping on the resident brings up their record from AddressingHistory and will sometimes be illustrated with an icon representing the profession of that addressee.

Screenshot of the AddressingHistory Augmented Reality layer.

Screenshot of the AddressingHistory Augmented Reality layer.

Above is a screen capture of the view at night looking out of our offices but we will add some additional images to the website along with more information about how to use the layer shortly.

 It all sounds complicated but it’s actually very easy to use once you are all up and running.

How to Install 

To use the AddressingHistory Augmented Reality layer you will need to download and install the Layar App on a compatible iPhone, Android or Nokia phone.  Once you have done this and have opened the app you need to add the AddressingHistory layer as a favourite. To do this search for “Addressing History” within the App. Alternatively you can do directly to the layer page (http://www.layar.com/layers/buildar11124) as shown below:

Image of the Addressing History Layer download screen.

Image of the Addressing History Layer download screen.


QR code leading to the AddressingHistory Augmented Reality layer

Once you have added the AddressingHistory layer as a favourite you can start exploring the history of Edinburgh street by street – a perfect weekend activity!

The layer was built by the very talented EDINA software engineers using the buildAR tool. If you are interested in finding out more about the properly geeky parts of creating great geographic content for mobile phones then take a look at the occasional EDINA Mobile Geo blog.

Please do give the layer a try and let us know what you think – we think you’ll agree that this is a fantastic new way to browse AddressingHistory. We’d love to hear your feedback and experiences.

And if you think this is exciting…

Look out for another update from the AddressingHistory team very shortly with news of what we’ve been working on for the last few months…


OpenLayers Mobile Code Sprint

Last week EDINA had the opportunity to take part in the OpenLayers Mobile code sprint in Lausanne. A group of developers from across the world gathered to add mobile support to the popular Javascript framework.

After a week of intensive development we have been able to add a number of new features allowing OpenLayers to function on a wide range of devices, not only taking advantage of the touch events available on iPhone and some Android mobiles to allow touch navigation, but also enabling the OpenLayers map to be responsive and useful on other platforms, or even unexpected devices!

Jorge Gustavo Rocha and myself worked on adding support for HTML offline storage. Covering storing maps and feature data on the users local browser using the Web Storage and Web SQL standards. Here is the example sandbox which allows the user to store map tiles for the area they are viewing, which are automatically used instead of downloading the online image when possible.  More details on this and other features added can be found on the OpenLayers blog.

I have to say I wasn’t sure what to expect, and I have certainly found it rewarding contributing to OpenLayers and working with such a dedicated and talented team of developers. Far more was achieved than I would have thought possible in such a short space of time. Very inspiring stuff!